When I first started deploying workloads on Kubernetes, I had one very innocent assumption: “Kubernetes is smart. It will put my pods on the right nodes automatically.”
Reality hit hard when my critical pods landed on “weak” nodes, GPU-heavy workloads were assigned to nodes without GPUs, and memory-hungry apps accidentally killed their host nodes.
That was my wake-up call. Scheduling is smart — but only if you teach Kubernetes what “right” means. Today, I’m sharing the “Aha!” moments that helped me master how pods and nodes negotiate.
How Kubernetes Thinks About Scheduling
When you create a Pod, the Kube Scheduler acts like a matchmaker, asking four vital questions:
- Which nodes are allowed?
- Which nodes are preferred?
- Which nodes have enough CPU & memory?
- Which node is the absolute best fit?
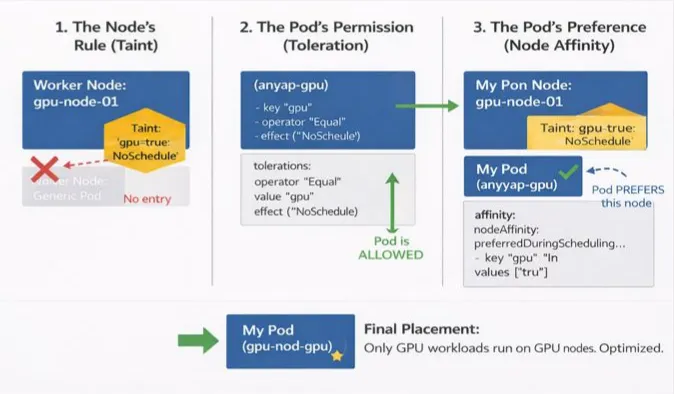
Taints & Tolerations: “You Shall Not Pass!”
My first lesson came when I noticed system nodes behaving strangely. It turns out Kubernetes protects important nodes using Taints. A taint is applied to a node and essentially says: “Pods are NOT allowed here… unless they explicitly tolerate me.”
The Command (Taint the Node): kubectl taint nodes node1 dedicated=infra:NoSchedule
The Pod Spec (Toleration): To let a pod land on that node, you must add a toleration:
tolerations:
- key: "dedicated"
  operator: "Equal"
  value: "infra"
  effect: "NoSchedule"
Real Use Cases:
Protecting specialized hardware like GPUs.
Reserving nodes for infra tools (Prometheus, Loki, etc.).
Isolating production workloads from staging.
NodeSelector: “I Want That Node”
After taints, I tried a simpler approach: NodeSelector. It’s the most basic way to constrain pods to nodes with particular labels.
Label the Node: kubectl label node node1 disktype=ssd
The Pod Spec:
nodeSelector:
  disktype: ssd
The Catch: It’s very strict. It’s a “binary” choice: either the node matches perfectly, or the pod fails to schedule. This lack of flexibility is why I eventually moved to Node Affinity.
Node Affinity: Scheduling with Preferences
Node Affinity is like NodeSelector on steroids. It allows for “soft” rules and complex logic.
1. Required (Hard Rule)
The pod will not run if no matching node exists.
affinity:
  nodeAffinity:
    requiredDuringSchedulingIgnoredDuringExecution:
      nodeSelectorTerms:
      - matchExpressions:
        - key: disktype
          operator: In
          values:
          - ssd
2. Preferred (Soft Rule)
Kubernetes tries its best to find a match but won’t block scheduling if it can’t. This is my personal favorite for high availability.
affinity:
  nodeAffinity:
    preferredDuringSchedulingIgnoredDuringExecution:
    - weight: 1
      preference:
        matchExpressions:
        - key: zone
          operator: In
          values:
          - us-east-1a
Resource Requests & Limits: The Silent Scheduler Rule
This one burned me early in my career. If you don’t tell the scheduler how much “space” a pod needs, it guesses — and it usually guesses wrong.
- Requests: The minimum guaranteed resources. The scheduler uses this to find a node.
- Limits: The maximum allowed. The node enforces this at runtime.
Example Pod Spec:
resources:
  requests:
    cpu: "500m"
    memory: "256Mi"
  limits:
    cpu: "1"
    memory: "512Mi"
Pro Tip: No requests = pod can land anywhere (risky). No limits = pod can kill the node (dangerous).
Putting It All Together
The true “Aha!” moment is realizing these features work together. Here is the mental checklist I use today:
- Taint nodes to protect them from “random” pods.
- Tolerate only trusted workloads on those restricted nodes.
- Use Node Affinity for smart placement (e.g., keeping pods in the same cloud zone).
- Define Requests so the scheduler knows exactly how much “room” is left on a node.
- Set Limits to act as a safety net for the entire cluster.
By moving from “random scheduling” to intentional orchestration, you ensure your cluster stays healthy and your apps stay fast.
Thank you for reading!
If you found this article helpful, consider following me for more content on Linux, Kubernetes, Observability, DevOps, and Cloud Engineering.
Your support helps me publish more practical, real-world technical guides.